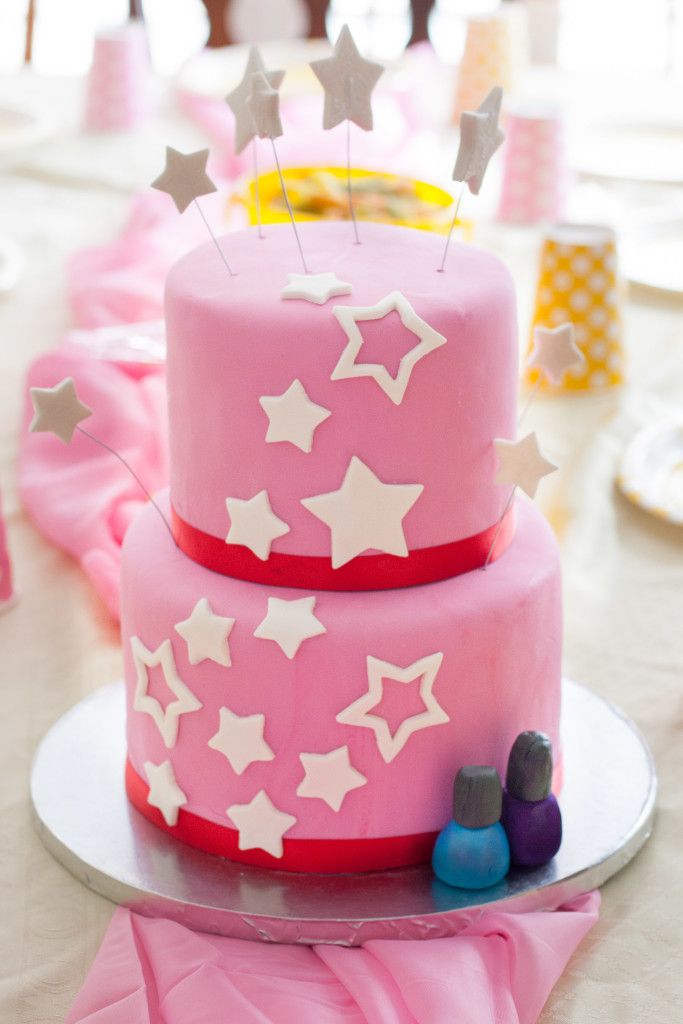

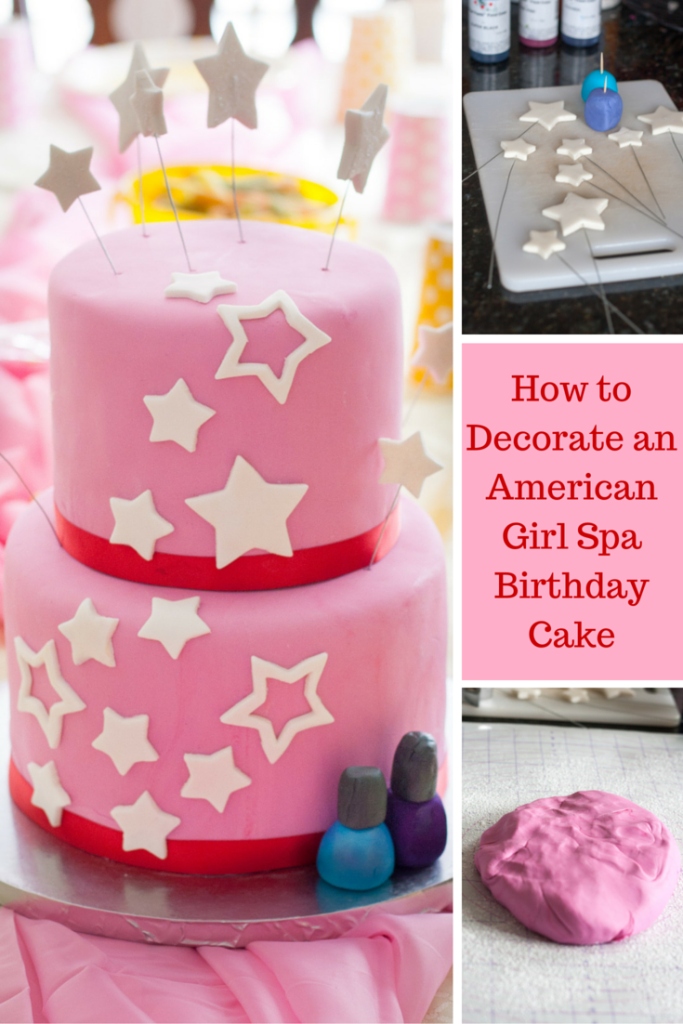
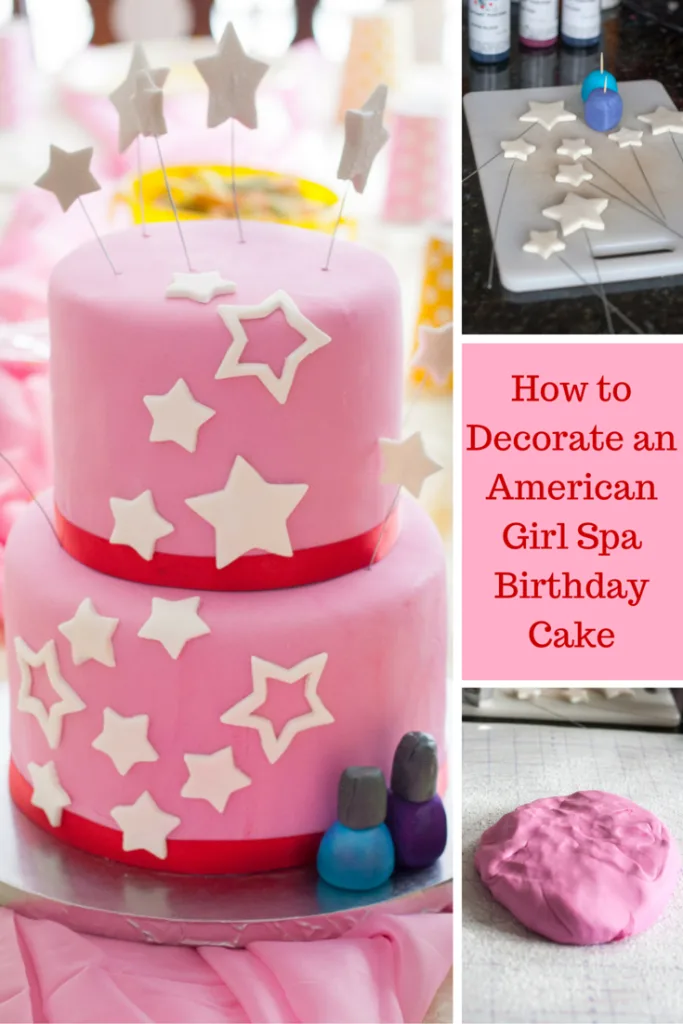
Happy Monday darlings! Today I have a tutorial for you sharing how to decorate an American Girl cake. My friend Sarah at Cook With 5 Kids has a darling little daughter who just celebrated a birthday, and I made her cake! The party was American Girl Spa themed and held at Sarah’s home with event coordination and loads of darling details by Misty at Frosted Events. The party theme was American Girl Spa, and I wanted to create a cake that fit the theme perfectly! This cake design is achievable even for a novice cake decorator and those new to fondant.
One thing you will not see on this cake is the American Girl logo. I hesitated a little about this, but ultimately decided against including the logo. First of all because the party wasn’t just American Girl themed, and second, logos can be tricky to replicate exactly and I wanted this tutorial to be easy for novice decorators. Finally, I always hesitate a bit when it comes to copyright and exact replicas of something, even when – as in this case – the cake was not for profit.
Side note for my professional baker readers: If you are a professional baker, please keep in mind that there are licensing fees to make licensed characters, and they aren’t cheap! You are allowed some leeway usually when it comes to “inspired by” cakes, but fees can be hefty if a company comes after you for copyright infringement. Tread carefully. Back when I had my bakery and learned about licensing, I told customers I would gladly make “inspired by” items, but not an exact replica. I never lost a customer. That being said, I have made logo items as gifts for friends or family. Ultimately, the decision is up to you and your personal comfort level with copyright infringement and creative license, but since this is something I didn’t know when I started, I’m putting it out there for you.
Inspiration behind the cake…
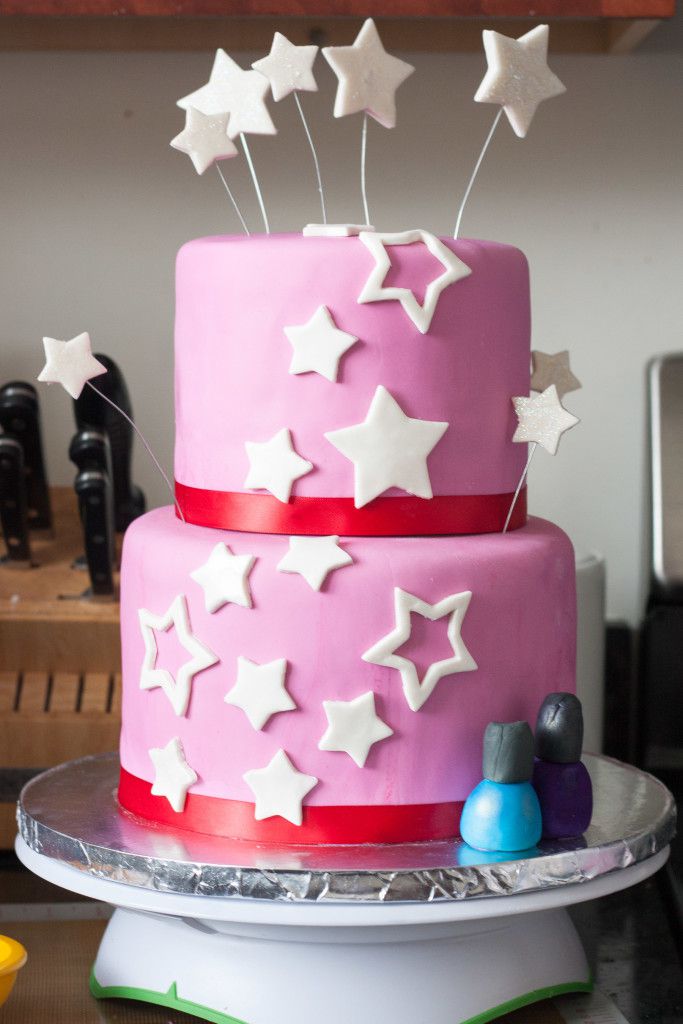
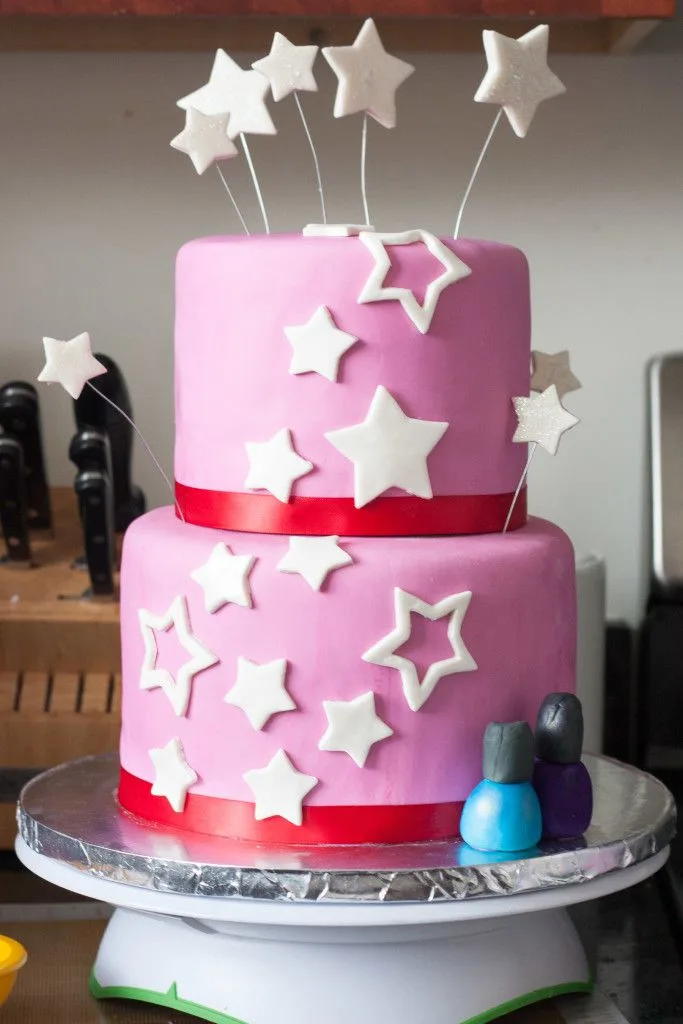
I incorporated the American Girl theme by using the dark pink and burgundy colors used in the AG branding, and adding stars along the cake. Since the party was also spa themed with pedicures for the little girls, I used gum paste to shape two nail polish bottles in the birthday girl’s favorite colors to set alongside the cake. To add a fun touch, I topped the cake with sparkling fondant stars set at the ends of floral wire for a 3D effect.
The Basics
This cake as shown feeds 40. It is an 8″ 3 layer yellow cake with a cookies and cream filling, and a 6″ 3 layer chocolate cake with cookies and cream filling. You may find my recipe for yellow cake here. I am currently testing new chocolate cake recipes as my former “go to” for 8″ cakes and up is no longer making me happy. In the meantime, I have 6″ round chocolate cake recipes posted here and here, and both are delicious. 😉 To get three layers, use a kitchen scale to evenly divide the batter into 3 parts for baking.
I used Satin Ice fondant to cover the cake. since the cake is tall with 3 layers of batter, you will use several pounds of fondant. It will take close to 3 lbs of fondant to cover the cake, and then you will need extra to make the nail polish bottles and cut out the stars. You can find 5 lb packages of fondant (brands vary) at craft stores near you or here on Amazon.
I’m going to gloss over the filling and frosting of the cake, as I assume that if you’re trying fondant, you have spread frosting on a cake before. 😉 If not, check out some of the other cake tutorials on the website. Your 6″ tier should sit on a 6″ cake round so it doesn’t show in the final design. My bottom tier sat on a 10″ round so I had room to place the nail polish bottles.
The important thing to remember for this step is to make sure your frosting is smoothly applied to the cake. Lumps and bumps will show under fondant! A good cake turn table and offset spatula help here. If you are using ganache, allow several hours or overnight for the ganache to fully set. If you are using a crusting buttercream frosting as I have here, chill the frosted cakes for an hour or so to allow the frosting to become quite set.
While the cake is setting, go ahead and dye your fondant. I colored almost 3 lbs of my white fondant pink using the Americolor light pink and fuchsia gel colors in this set. I cannot recommend this set enough as a great basic kit to have on hand to color desserts. I don’t have to use much to get a vibrant color and the fact that the bottle has a dropper makes working with these gels so much cleaner and colors are easier to replicate.

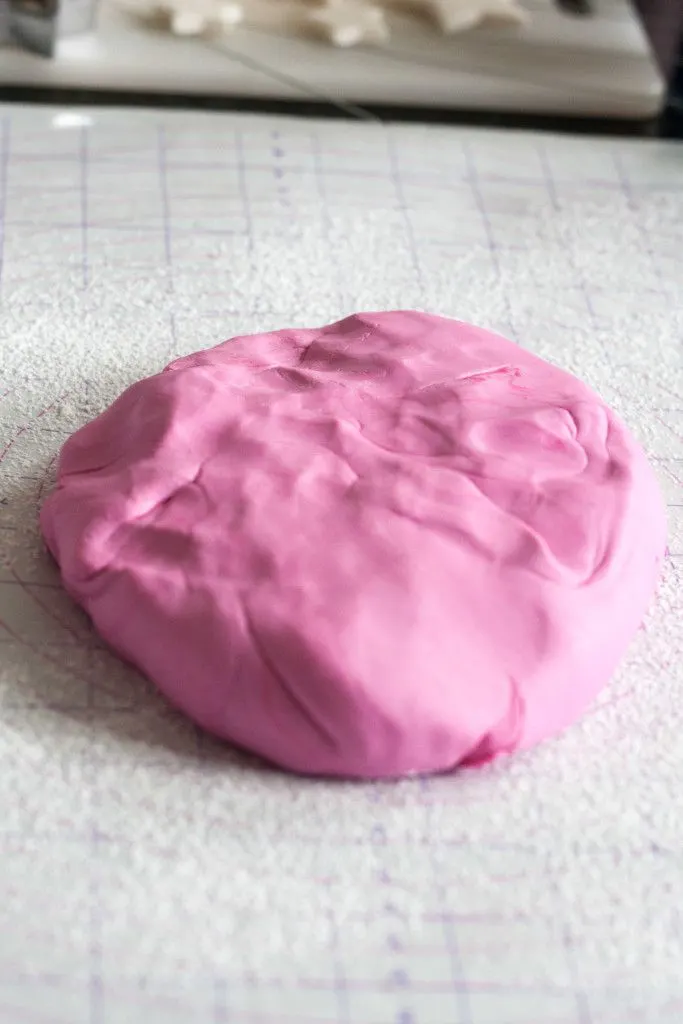
To prevent your hands from being dyed all sorts of fantastic colors, use food-safe gloves. It also helps to have some shortening on hand to knead into the fondant so it doesn’t stick and is nice and smooth. Once your fondant is the color you’d like (keep in mind that it will darken as it sits), wrap it tightly in plastic wrap and place into a zip top plastic bag with most of the air removed. Air will dry out your fondant and you don’t want that!
Applying the Fondant
Once you have your cakes frosted and chilled so the frosting is firm, it’s time to apply the fondant. Using a large silicone work surface or a fondant rolling mat, roll your fondant large enough to cover the diameter and height of the cake. I believe mine bottom tier was 8.5″ across (account for frosting!) and 7″ high, so I rolled fondant into a 22″ circle. Measure each of your tiers and roll a circle just slightly larger in diameter than the sum of the diameter of the top of the frosted cake and the height of both sides.
If you’re having trouble with your fondant sticking, dust just the lightest bit of cornstarch or powdered sugar onto your mat. Be sure to roll out the fondant as you would a pie crust, working in one direction and rotating as needed. Gently roll the fondant partway over your rolling pin and transfer to your cake so that the center of the fondant circle lines up with the center of the cake. Working from the top center out, gently lift and smooth the fondant, cutting away excess at the bottom as needed. Don’t stretch or you may end up with “elephant skin” fondant on part of your cake. Once the fondant has been placed, use a fondant smoother to smooth out the fondant, working center out and top to bottom. Trim excess if needed. If you have a crease here or there. Use the heat of your hand to gently rub over the area and smooth it out. If the very bottom of the cake isn’t perfect, don’t stress! Covering a cake with fondant takes practice, and with this design, we are covering any minor imperfections anyway. 😉
Once both cakes are covered, it’s time to stack the tiers.
Stacking the Cake Tiers
You may think, “this cake is only two tiers, I don’t really need to worry about building supports into the cake, right? Wrong. This cake is heavy, and the last thing you want is your top tier sagging into your bottom tier or your top tier flying off the cake in transport because it’s not properly attached.
I created a support by placing 4 lollipop sticks around the center of the cake in equal intervals. I cut the sticks to the height of the bottom tier, so when pushed down into the cake, they are invisible, but provide a nice level platform on which the top tier can sit. The center dowel will fit through a hole in the bottom of the top tier cake board and runs through the bottom cake board, holding the top tier to the bottom and the bottom tier in place. Use a topper to cover the small gap at the very top of the cake where the large dowel is inserted.
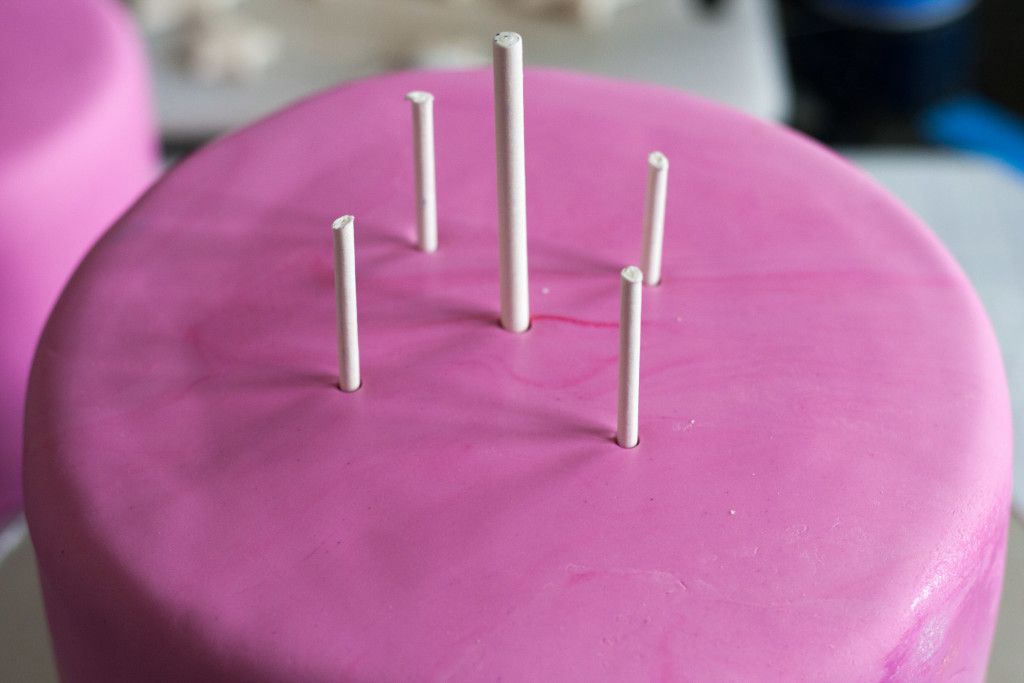

This shows you the layout and placement of the dowels in the bottom tier.
Adding the Decorations
The first step in making your decorations is to shape the three dimensional stars on floral wire and making the nail polish bottles.

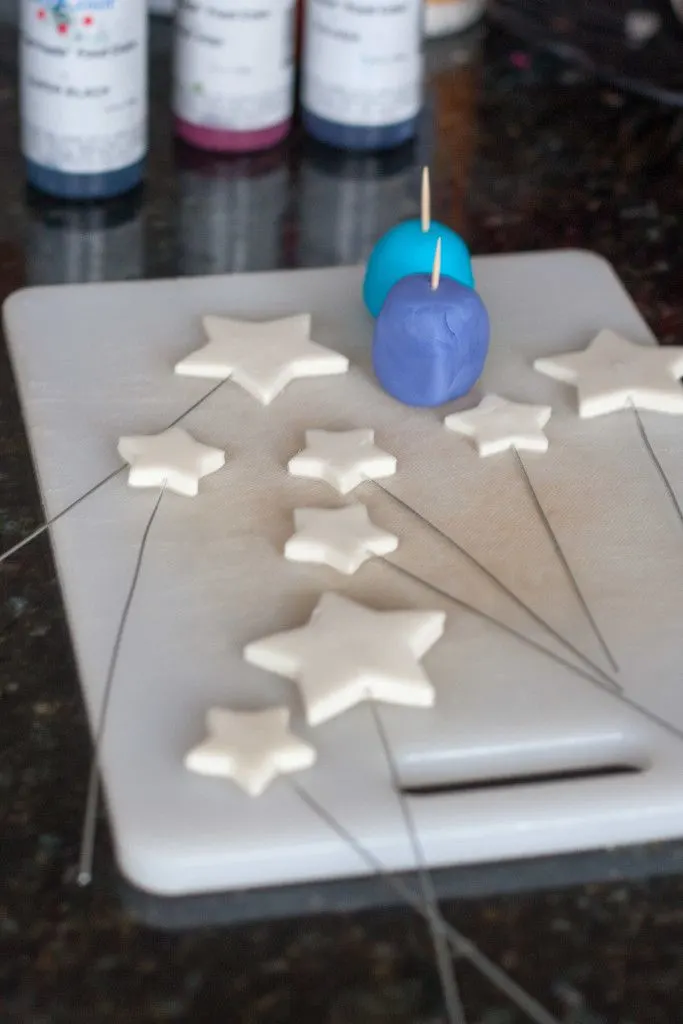
Start by cutting floral wire into varying lengths (find at any craft store). Set aside. Roll out your white fondant to a bit under 1/4″ thick and cut out as many stars as you’d like to use in your final design. I used the smaller stars from a nesting star cutter set. Insert a piece of wire gently into the star until it reaches the center. Be sure the wire isn’t poking out either side of the star. Set aside to dry.
Make the nail polish bottles by coloring a bit of fondant in your desired shades (another place that gel set I linked to earlier comes in handy), and shape into balls or squares or whatever shape you prefer for your nail polish bottles. Break a toothpick in half and insert into the top of each bottle. This will hold the top and bottom of the bottles together. I used a little peacock blue luster dust and plum luster dust to add a little sheen to the bottles. This is optional. I used a clean food-only paintbrush to brush the dust on dry. Dye fondant black and roll into a snake, cutting into two pieces, then attach to the nail polish bottles to make the tops.
To add sparkle to the stars on the floral wire, I painted on a white disco dust using a bit of lemon extract. Once one side was dry, I carefully flipped the stars and painted the other. Do not use disco dust on any part of the cake that is to be eaten. Use a luster dust instead if you’d like to add shimmer to the stars on the cake.
Before cutting out the stars on the cake, use a burgundy ribbon to edge the bottom border of both tiers on the cake. I used one I bought at a craft store. You may also dye fondant and cut ribbons, but I chose to take the easy route here. 😉 Brush the bottom of each cake very lightly with piping gel and place the ribbon along the bottom, cutting the excess at the end.
Cut out the stars for the cake using the nesting star cutter set, making a few open stars to mimic the American Girl design. Brush with luster dust using a clean, dry, food-only paintbrush if desired, and attach to the cake in your desired pattern using piping gel. Since I was adding the nail polish bottles, I decided to place the stars in a simple cascade pattern down the front of the cake.
The nail polish bottles are attached to the cake board using a bit of frosting.
Finally, place the floral wire star sprigs into the cake and then step back and admire your masterpiece!
I hope you enjoyed this tutorial! If you have any questions, leave me a comment below or send me an e-mail!
Sara
Saturday 19th of December 2015
This cake not only looked incredible it tasted amazing!! Goodie godmother is an incredible talent in the kitchen!!!! Thank you for making the party extra special.
Nicole @Little Blog on the Homestead
Tuesday 15th of December 2015
Looks great! So glad to have you back up on the internet btw. I had the Molly American Girl doll when I was younger, one year my grandma got it in her head that we all needed them. I was a little old for them, but I did love the books a whole lot. Wish I would have kept it so I could gift it on to my God daughter who is just about at that point where all things AG is HUGE!
The Godmother
Friday 18th of December 2015
It's amazing to see the staying power of the dolls, isn't it? I loved the books too!
The Oracle
Monday 14th of December 2015
I got my niece that book series for Christmas
The Godmother
Monday 14th of December 2015
She'll be so excited! I LOVED the books as a little girl.