
A beautiful dessert board can make any occasion special! Learn how to put together your own s’mores board in no time with this tutorial!

With all the extra time we’ve been spending at home, I’ve really enjoyed the opportunity to make the everyday a little special. Our family has always enjoyed “fire nights” on cool evenings, complete with marshmallow roasts! Usually, they are simple, but sometimes, you want to make them special! When we lit our little gas fire pit for our first fire night this year, I went a little crazy and made a HUGE s’mores board. And of course, I’m sharing everything you need to know to make your own!
I just want to start by saying that you can make your s’mores board as complex or simple as you’d like. What makes a dessert spread like this so special is the presentation. And there’s also no fixed right or wrong for the presentation. Assembling something like this is supposed to be an exercise in fun and creativity. All the ingredients and presentation ideas here are just suggestions.


What ingredients do I need for a s’mores board?
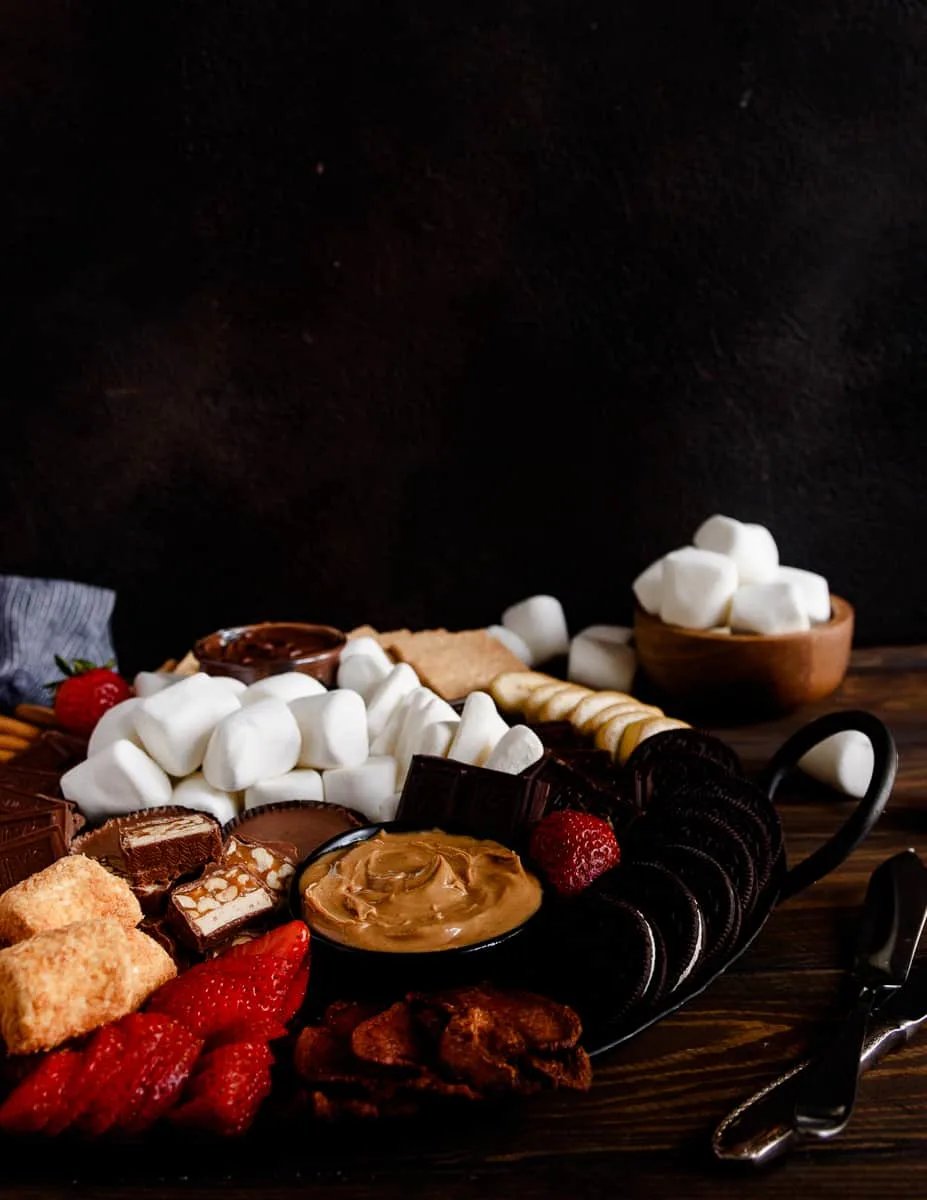
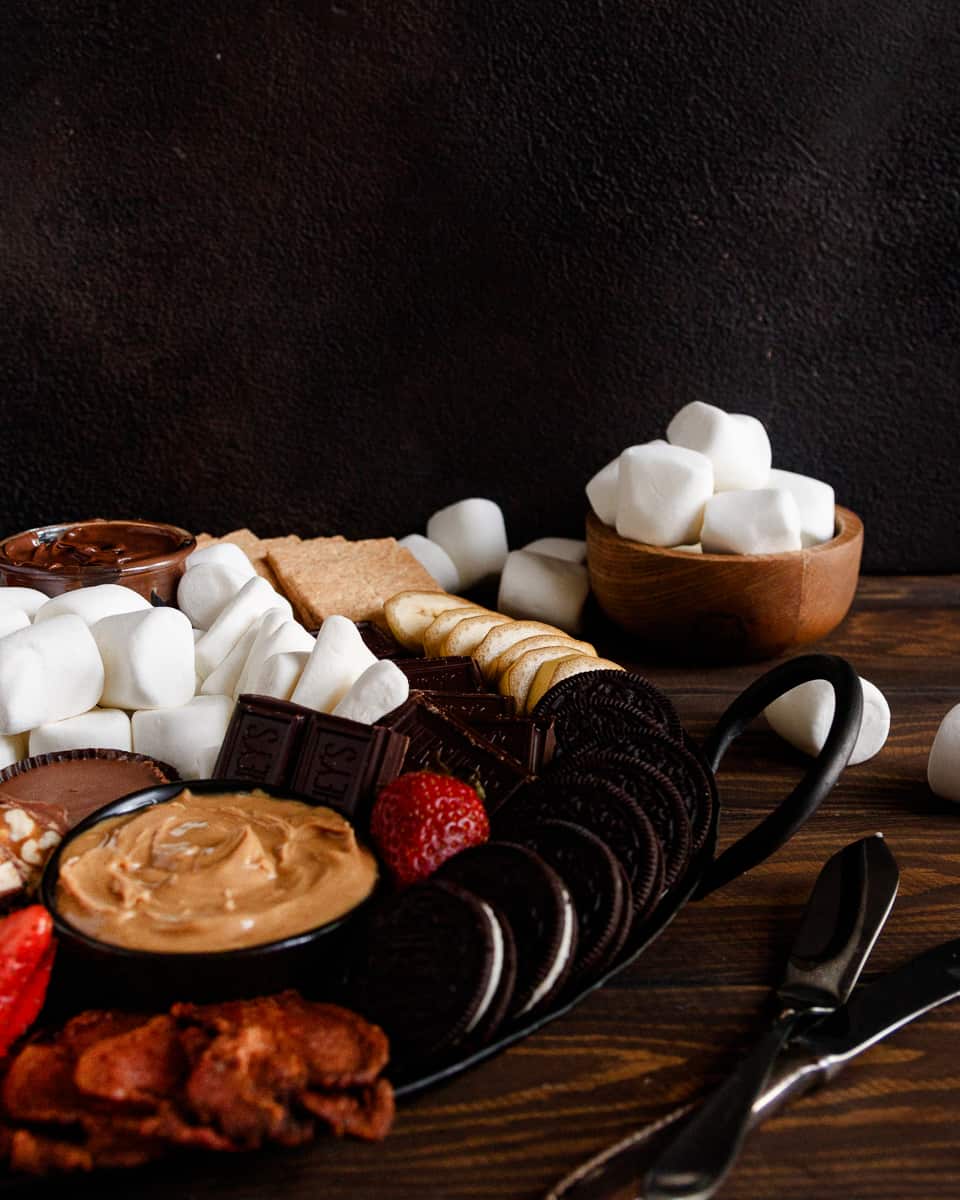
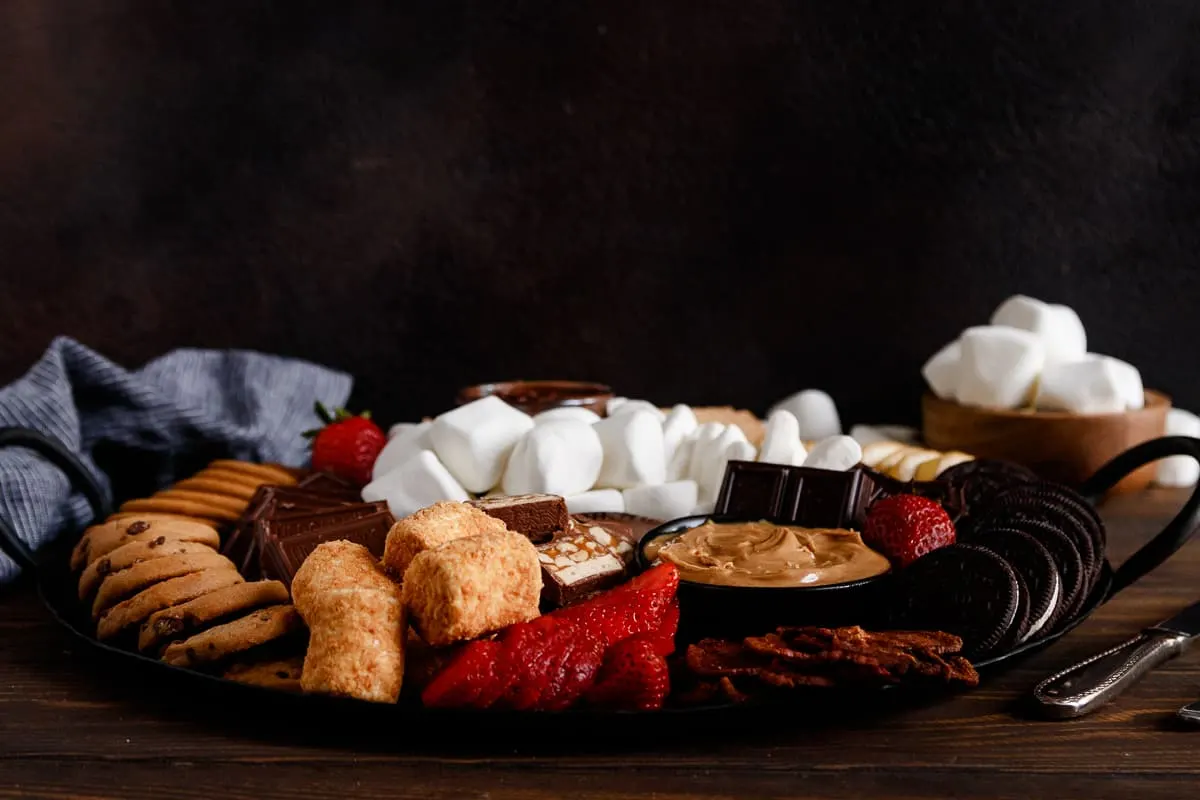
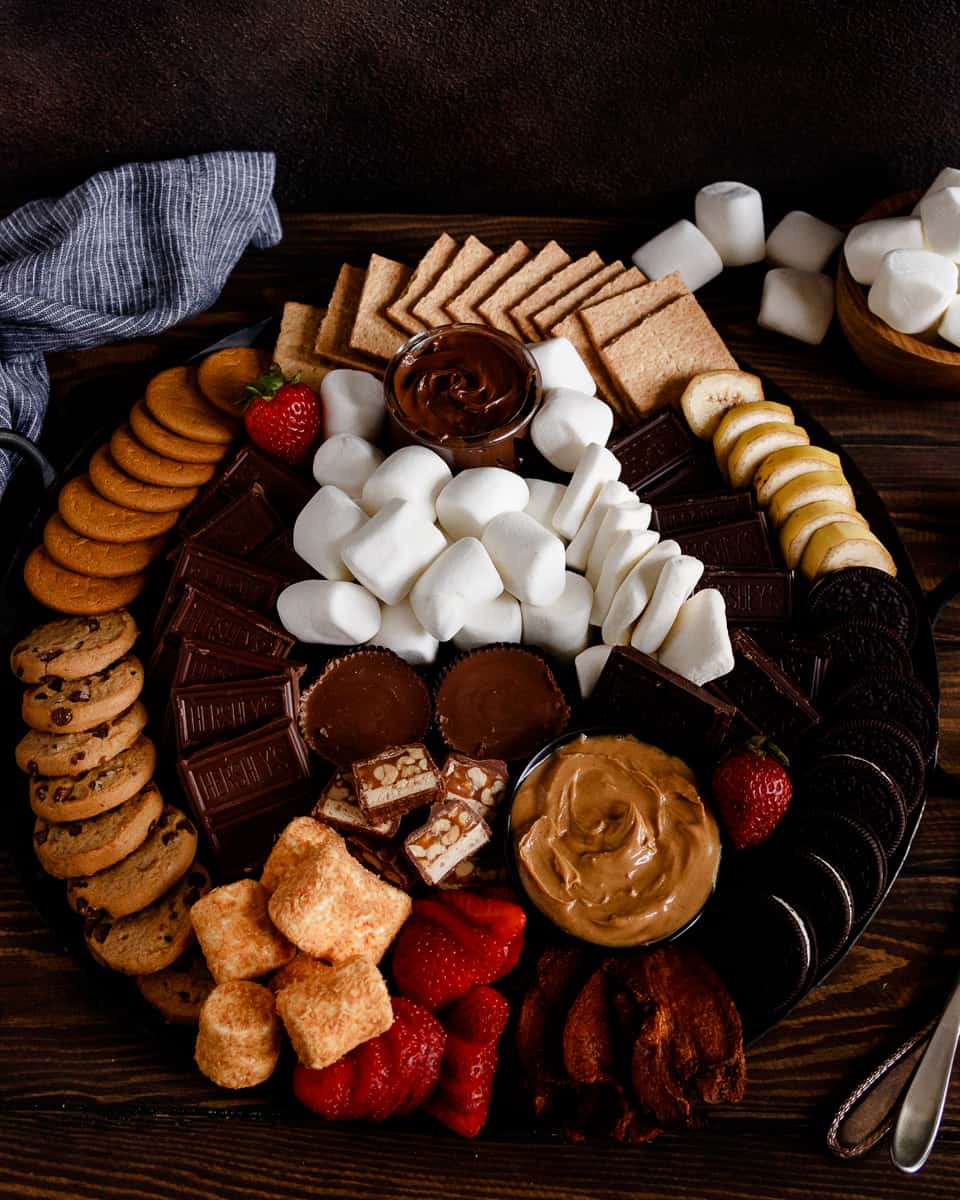
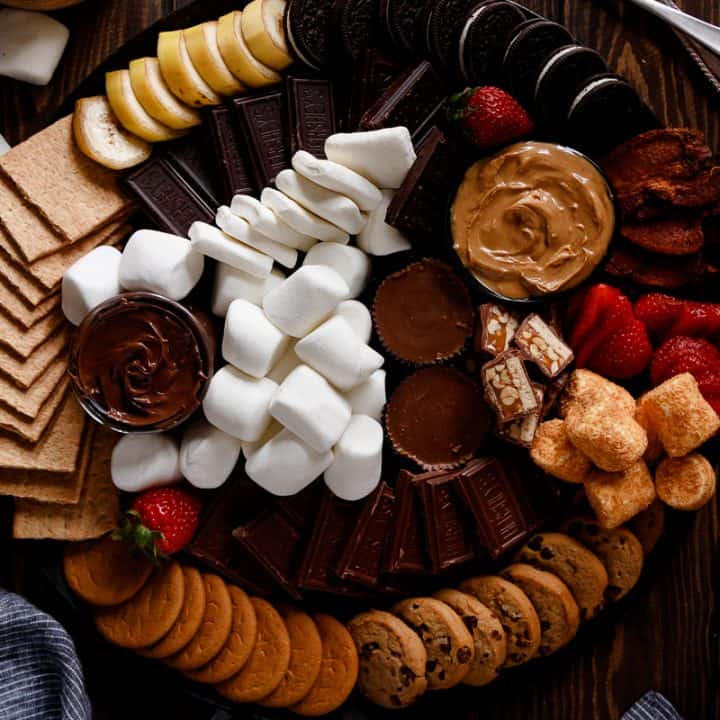
You’ll definitely want your basics: marshmallows, graham crackers, and chocolate. Anything beyond that is your opportunity to be creative and offer variations on these three. The easiest way to think about this is to break the ingredients down into categories:
- For Toasting:
- This is your “marshmallows” category. Jumbo marshmallows are classic, and you can use just those and it’s perfect! If you find flavored marshmallows in the store, or fun shapes that you want to include, those are great too. I used “stacking” marshmallows and toasted coconut marshmallows – both were a hit!
- Even homemade marshmallows like these vanilla bean marshmallows, matcha marshmallows, or coffee marshmallows would be great!
- For Topping (i.e. – graham crackers and such):
- graham crackers (naturally)
- chocolate graham crackers
- chocolate chip cookies
- Oreos
- ginger snaps
- lemon cookies
- thin slices of pound cake
- brownies
- apple or banana slices
- For Filling (chocolate, spreads, extra additions):
- chocolate – milk, dark, white, crunch
- sliced candy bars
- peanut butter cups
- chocolate hazelnut spread
- peanut butter, almond butter, or sun butter
- honey
- jam
- caramel
- crispy cooked bacon
- berries

Naturally, this is just a list of every suggestion I can think of and not all of these made my board. BUT, I love having a long list like this so I have an idea of what I’m looking for when I start shopping the pantry or go to the store.
What kind of serving plate do I use to set up my dessert board?
I highly recommend using a tray, large cutting board, or rimmed baking sheet. You want something that can be easily moved from the kitchen to the fire pit. I recommend something without a pedestal just because it’s sturdier and you don’t need to worry if someone accidentally bumps the table.

What other items will I need for the BEST s’mores night ever?
Okay, so haven’t a s’mores board doesn’t guarantee the best night ever, but it’s a really good start. 😉 In addition to the board, you’ll want a way to toast the marshmallows, naturally. If you have a fabulous large fire pit, great! We used to have a wood one, but after our move and significantly downsizing our backyard, we switched to a tiny little gas-powered fire tower. It’s great for small spaces and much safer than wood!

But what if you don’t have an outdoor space? You still have options! The first option is to get a little tabletop s’mores maker that you can use indoors. I’d only recommend this if s’mores are something you want to feature pretty regularly. Otherwise, you can put your marshmallow on a skewer and use a kitchen torch (like the one you use for creme brulee) to toast them. Finally, you can use a toaster oven or the broiler in your regular oven. Place a marshmallow on your preferred cracker and then toast for 2-3 minutes. If you’re using something like chocolate chip cookies though, prepare for a little extra messy fun with melted chocolate chips.
I hope you enjoy this little video tutorial I’ve put together for you! At the end of the video, you’ll get to see my board come together.
Let me know if you make one, I’d love to see it! Happy s’mores making, darlings!

S'mores Dessert Board Tutorial
A beautiful dessert board can make any occasion special! Learn how to put together your own s'mores board in no time with this tutorial!
Ingredients
Marshmallows:
- Jumbo classic marshmallows are perfect, you can add different shapes or flavors as you'd like!
Crackers, cookies & more:
- graham crackers (naturally)
- chocolate graham crackers
- chocolate chip cookies
- Oreos
- ginger snaps
- lemon cookies
- thin slices of pound cake
- brownies
- apple or banana slices
Fillings:
- chocolate - milk, dark, white, crunch
- sliced candy bars
- peanut butter cups
- chocolate hazelnut spread
- peanut butter, almond butter, or sun butter
- honey
- jam
- caramel
- crispy cooked bacon
- berries
Instructions
- Gather all your ingredients and a food-safe board, tray, or rimmed baking sheet on which to arrange your ingredients.
- If you are using an ingredient like crispy bacon, cook the bacon now. The easiest way to do this is to air fry the bacon at 375 F for about 7 minutes. Alternatively, bake in a 400 F oven on a rimmed baking sheet for 15-20 minutes until crispy. Pat with paper towels before putting on your board.
- Wash, dry, and slice any fruits you are using.
- Arrange all your s'mores ingredients any way you'd like on your serving platter. If you are including any jams or spreads, please be sure to include a serving utensil for each.
- Take your fabulous creation out to your fire pit and enjoy!
Notes
- Ingredients like bacon and fruit should be added to the tray immediately before serving. Unlike most other ingredients, they cannot sit out very long safely.
Recommended Products
As an Amazon Associate and member of other affiliate programs, I earn from qualifying purchases.
-
 FIREPIT STIX 50 PCS | Bamboo Marshmallow ROASTING STICKS | 36" Long 5"mm Thick Extra Long Heavy Duty | Semi-Dulled Point | Wooden BBQ S'Mores Hot Dog Skewer | Great for Parties and Weddings!!
 -
 Bond MFG Company FS 10x22 Fire Column 51159
 -
 Nostalgia Indoor Electric Stainless Steel S'mores Maker with 4 Compartment Trays for Graham Crackers, Chocolate, Marshmallows and 2 Roasting Forks, Brown